Friday, March 25, 2016

More Minnie Mouse

Hello friends, I made some more Minnie mouse decorations for a friends birthday party. I have been sick so it was just a few.  I wanted to add them on here so everyone could see them. The banner was made with the cricut alphabet. I cut the white card-stock into 6"x 6" pieces and rounded the corners. I bought pink paper with white polka-dots for Minnie I cut the scalloped shape from Elegant edges. I just did capital letters with a black shadow. I think they look so cute. I used a glue gun to glue them to some twine I had here at the house. The centerpieces are formula cans covered with pink polka-dot paper. I made the 2 to cover the space where the paper didn't go completely around. I just cut several icon shapes from the Disney- Mickey and Friends cricut cartridge. I got two small pin wheels that I added, b/c I thought they were cute. (I got them on sale at Hobby Lobby for 49 cents) 
I put floral foam in the can to hold the dowels, then I added dried beans so they wouldn't tip over b/c the Minnie Mouses were so tall. If I make them again I will add a birthday package for her to stand on.


I put them on two strings to be hung Happy then Birthday under it but she decided to put them all together.

Close up of the banner


I made two centerpieces b/c she said she was having it at the park and there are only two picnic tables.
These are so cute, they are one foot tall. 

I wish I had made a birthday package and put her standing on it. Oh well, too late now. Everyone is happy so I guess that is all that matters. Like I said I've been so sick and didn't feel like doing anything, but I promised to make them so here they are. They turned out ok. 


Tuesday, July 28, 2015

Alivia's Minnie Mouse Birthday Party

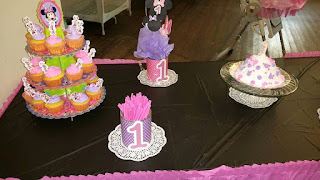
These are the centerpieces I made.

The Minnie Mouse Happy Birthday Banner

'
This is half of the cake table


The Birthday Cake & 1 candle! 
Happy First Birthday Alivia Grace, 
Grandma loves you! oxoxox


This what all the tables looked like


The Birthday Girl with Mommy & Daddy


We put pink w/white polka dot tape on the bottles and had drink flavor packs on the tables. If you look they are baby food jars with the mickey icon. I don't have a photo right now of her gift table. I also do not have a photo right now of Alivia's high chair. I decorated it too with balloons and pink tulle. I was so cute. (will try to get those photos on in an update)  We had a lot of fun. She seemed to enjoy her cake too. 

Thanks for stopping by.

SMILES,      
Alivia's Grandma

Saturday, July 25, 2015

Brenda & Richard's Wedding Album

My Very First Scrapbook EVER!!!

This is my very first scrapbook ever. I am pretty happy with it. I am not happy with the very first page but the rest is fine. Actually the first page is ok except I cut the letters in cream instead of white


Scrapbook Cover
I wish I had cut the title out of white.
 (then it would be perfect)
pages 2-3
pages 4-5

pages 6-7
The End


 I really had a good time with this scrapbook it was really fun. I can't wait to make my next one. I'm sure it will be much better. I want to make some die cuts and have them ready for when I make a page I can use them to plan out my page. I found that if I plan the pages all out first and then glue them it goes so much faster. Plus I have lots of time to change my mind which I do a lot. ha ha I need to make several paper flowers so I have them ready. I could do the black & white photo mats and then just add paper where the picture goes. Or put a white piece of copy paper that is stamped place photo here. 


Here are some additional photos of this album. 


Thank you for stopping bye to look at my hard work. These do take a lot of time. I probably took twice as long to decide on paper and embellishments as it did to actually make it. Ha ha 


.

Friday, July 24, 2015

SNEEK PEEK at the Wedding Album

Well, it's not quite finished but I still have today. Ha ha The wedding isn't until tomorrow at 3:00. I started to take photos of the pages I had finished but the batteries in my camera died so this is a sneek peek. 
Cover
I'd like to get a photo of the couple off facebook and add to the album. Since it is so close to the wedding I am not sure if this will happen or not. I love the beautiful flowers on the front. Her colors are orange and grey so I thought this would be perfect. Please remember this is my VERY 1st Scrapbook album ever. It can only get better right? ha ha 
Page 1
I need to put a title here. I want to use. Our Love Story
The Dress Page

Groom Page


I will change the batteries and add the finished pages. 

Tuesday, July 21, 2015

Alivia's Princess Baby Album

Cover
This is the cover to Alivia's Princess Baby Album. I do not have all the photos in the album yet but at least it is finished. (At least for now, I may add a few more embellishments but it looks ok)


Page 1
This is the happy couple. My daughter, Amber & her husband, Bill. This is the first doctor appointment. I am so happy they let me (grandma) tag along. I got to hear the baby's heartbeat! I cried of course. My first grandchild. At this point we didn't know if the baby would be a boy or girl! I didn't care. I just wanted a healthy baby and safe mommy. So in the beginning this album had very little pink. As you can tell once I found out I was having a granddaughter I added all the PINK! and of course all the princess embellishments.  


Page 2 
The little half page to the left is page 1.5 I guess it is from the ends of the paper bags as this is a paper bag album. It's my very first paper bag album. 


Page 3 
This is my daughter, listening to her belly. She is using her grandpa's stethoscope. She is trying to hear the baby's heartbeat. Amber was very close to her grandfather. He passed away in June and we found out Amber was pregnant in October. So we were all still grieving his loss. It made using grandpa's stethoscope a little more special. 
Page 4 
 I also really little this little bear! With is little wand ...he is just adorable!


Page 5
Isn't this little sleeping bear so adorable!


Page 6
This is one of my favorite pages I love this crib! It's so CUTE! I can't wait to get a picture of Alivia sleeping to put in here. Plus maybe one with her playing in her pack-n-play with some toys. I love this tag with this little bunny he is SOOOO Cute! 


Page 7
I really like this little turtle too. He is really cute. I will try and get the rest of the pages photographed and uploaded in a few days to finish showing you this album. 


Page 8
This is the classic bath tub page. I can't wait to put some cute photos of Alivia! 
Page 9
Too Cute
Page 10 
This last page is not complete as you can see. I need to mat this but I was not sure if I wanted to mat it or just round the corners on the photos. So I left it blank.

Tags 
This is just two of the tags in this paper bag album. Each bag has two tags with each side matted with a place for a 4x6 photo. I used one tag  to journal about the photos. All the tags large or small could be used for photos or a journal spot. 

      Once again thank you all for being so patient. If you like this album please leave some comment love on this page. Become a follower too. We would love to have you visit often! I promise I am trying to post more often! It's that life is just so darn busy. LOL, I am a very active person. I have friends that I like to stay in contact with, plus my granddaughter, Alivia plus other hobbies & interests I have besides my cards & scrapbook albums. 
Thank you for stopping by! 
Leave some comment love if you have enjoyed this album so far! 
SMILES,

CardmakerMOM aka Tracy (Alivia's grandma) 

Sunday, July 19, 2015

Paper flowers

Good Morning Blog Followers & Guests,
 I thought I write a quick post. This is new for me. Something I have never done before. I purchased some paper flowers from hobby lobby and I just thought they were way too expensive. Remember this is my first time so they are not very good but you have to start somewhere. 
My first homemade paper flower.


I am not happy with them yet. I need more practice and they need some shine they are too dull. I really do not like that you can see the glue from the glue gun. Maybe I will try some different adhesive. I just used a pearl button for the center because it was what I had on hand. I will check into some beads & bling (I have some beads but didn't get them out of the closet, the buttons were already out for a different project) I want to also check into some gems. I have some Studio G bling. I think I will try. I am sure I will post more later as I get better at making them. This is just my first try and with only on shade of paper. I plan on trying two different paper patterns. More layers, less layers to see what I like. This was 3 sizes of petals. 2", 1.5" and 1" I used 2-2"; 2-1.5" and 1-1" for the center. I need to watch some youtube videos to see how to make these better. I am sure there are several videos to watch. I watched some years ago (2011) when I started to make cards and scrapbook pages but with dad getting cancer all of that go put on hold until now. 

The three flowers I made yesterday.


Anyway, enough about that. I just wanted to post of what's going on in my craft room. 
Thanks for stopping by (leave me a comment)
SMILES,
CardmakerMOM aka Tracy (Alivia's Grandma)


Wednesday, July 15, 2015

Thank you


Minnie Mouse Thank you Cards

Alivia's first birthday we had a Minnie Mouse themed party. These are the Minnie Mouse Thank-you cards I made for the gifts she received. They are super cute. I love the Mickey and Friends Disney cartridge I have for my cricut. I really love my cricut. I love to see the reaction on people's face when I give them a card like this. It is really not hard but looks like it! The cricut does most of the work for you. 

If you gave Alivia something for her birthday I hope you received one of these. If not they are at my daughter's ready to be written and sent to you. Let me thank you here in writing if you didn't get one.

Thanks everyone for stopping by!

SMILES, 
CardmakerMOM (Alivia's Grandma)